Pattern Matching, Zip Insertion & Clean Hem Finishing
TECHNICAL WORKSHOP · SEPTEMBER 2026 — ISSUE 02
What makes a garment beautiful is not always what we notice at first glance.
The colour, the silhouette and the cut of a fabric are what strike us first; but what truly reveals a garment's care is, more often than not, only noticed on closer inspection.
A plaid pattern perfectly aligned. A zip inserted cleanly. A hem rolled to the same depth at every point. A press applied at exactly the right moment.
This month at Zarif Atölye we take a close look at three quiet details: pattern matching before cutting, zip insertion, and clean hem finishing.
At first glance, all three may look like small details. Yet done well, they can give even a garment sewn at home a clean, professional finish.
Before Cutting: Pattern Matching
A good stitch sometimes begins long before the fabric ever meets the machine — before it is even cut on the table.
Working with patterned fabrics such as plaid, the smallest overlooked shift becomes instantly visible in the finished garment. This is why, before cutting the fabric, we set aside a few minutes purely for the pattern: taking the piece in hand, checking how the lines meet across the seam, and reaching for the scissors only once we're convinced.
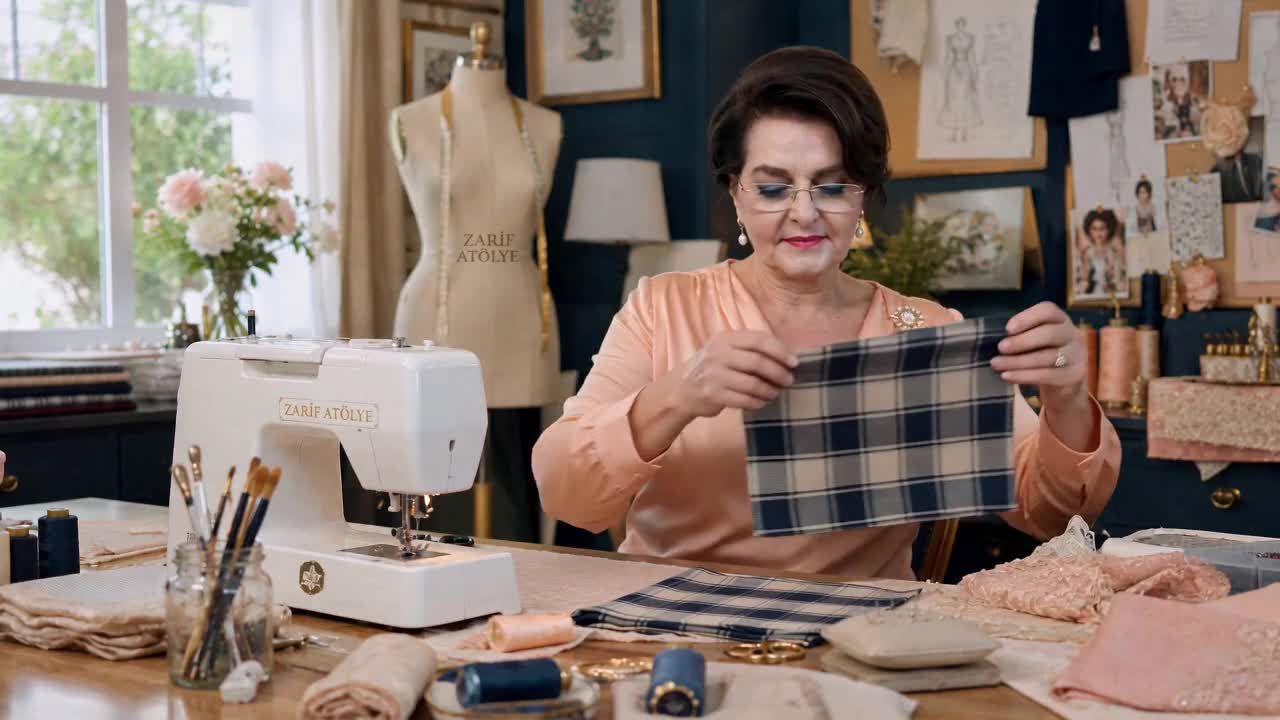
From the atelier — checking the plaid pattern by hand before cutting, testing the alignment by folding the pieces together.
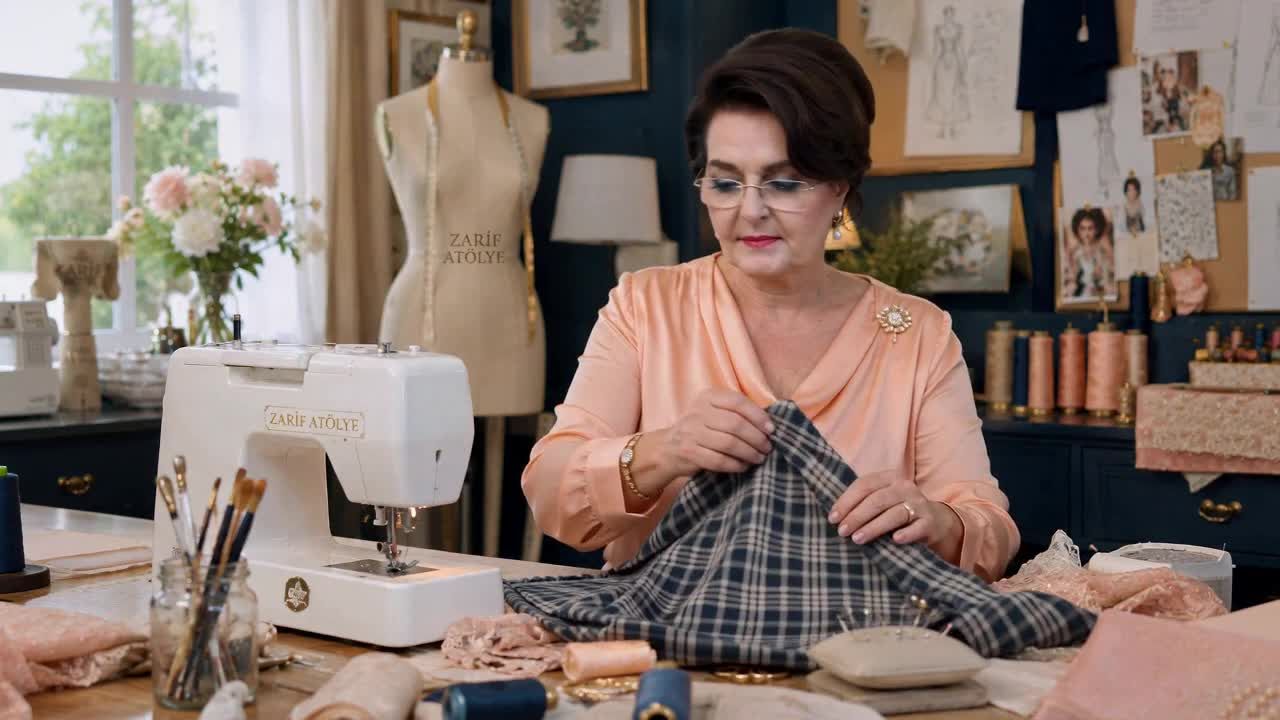
This is a habit in the atelier that matters just as much as the zip or the hem — it simply moves more quietly. No one, looking at a finished garment, says "the pattern has been checked here." But when it hasn't been, the absence is immediately visible.
This Month's Technique: Zip Insertion
Placement → Pinning → Zipper Foot → Stitching → Check
In zip insertion, the most important part is often not the moment we sit down at the machine, but the preparation we do before it.
If the zip is placed incorrectly or shifts against the fabric, however even the stitching itself may be, the two sides may fail to meet properly.
This is why we never rush.
1. Placement — First, position the zip over the opening. Make sure the zip teeth run parallel to the fabric edge. Check the top and bottom starting points to ensure the two fabric pieces meet at the same level. At this stage, closing the zip and checking the result is a small but important habit. If everything looks right, move on to pinning.
2. Pinning — Secure the zip so it cannot shift against the fabric, using pins, sewing clips, or a temporary basting stitch. Don't skip this step, especially with fine, fluid, or slippery fabrics. Even a shift of a few millimetres in the zip can cause the top and bottom meeting points to drift apart in the finished garment.
3. Zipper Foot — When you reach the machine, use a zipper foot instead of the standard presser foot. Thanks to its narrow shape, the zipper foot helps the needle travel in a controlled way alongside the zip teeth. Before you begin stitching, check the position of the foot and the distance between the needle and the zip teeth.
4. Stitching — Stitch the first side of the zip slowly and at a steady pace. The aim is not to get as close as possible to the teeth, but to create a stitch line that stays straight and parallel from start to finish. Once the first side is complete, stitch the second side with the same care. Don't pull the fabric under the machine; let it move at its own natural pace.
5. Check — Once the stitching is done, don't reach for the iron right away. First, open and close the zip a few times. Does it move smoothly? Do the two sides meet at the same level? Are the stitch lines parallel to one another? If everything looks right, you can finish with a light press at a heat suited to the fabric's care requirements.
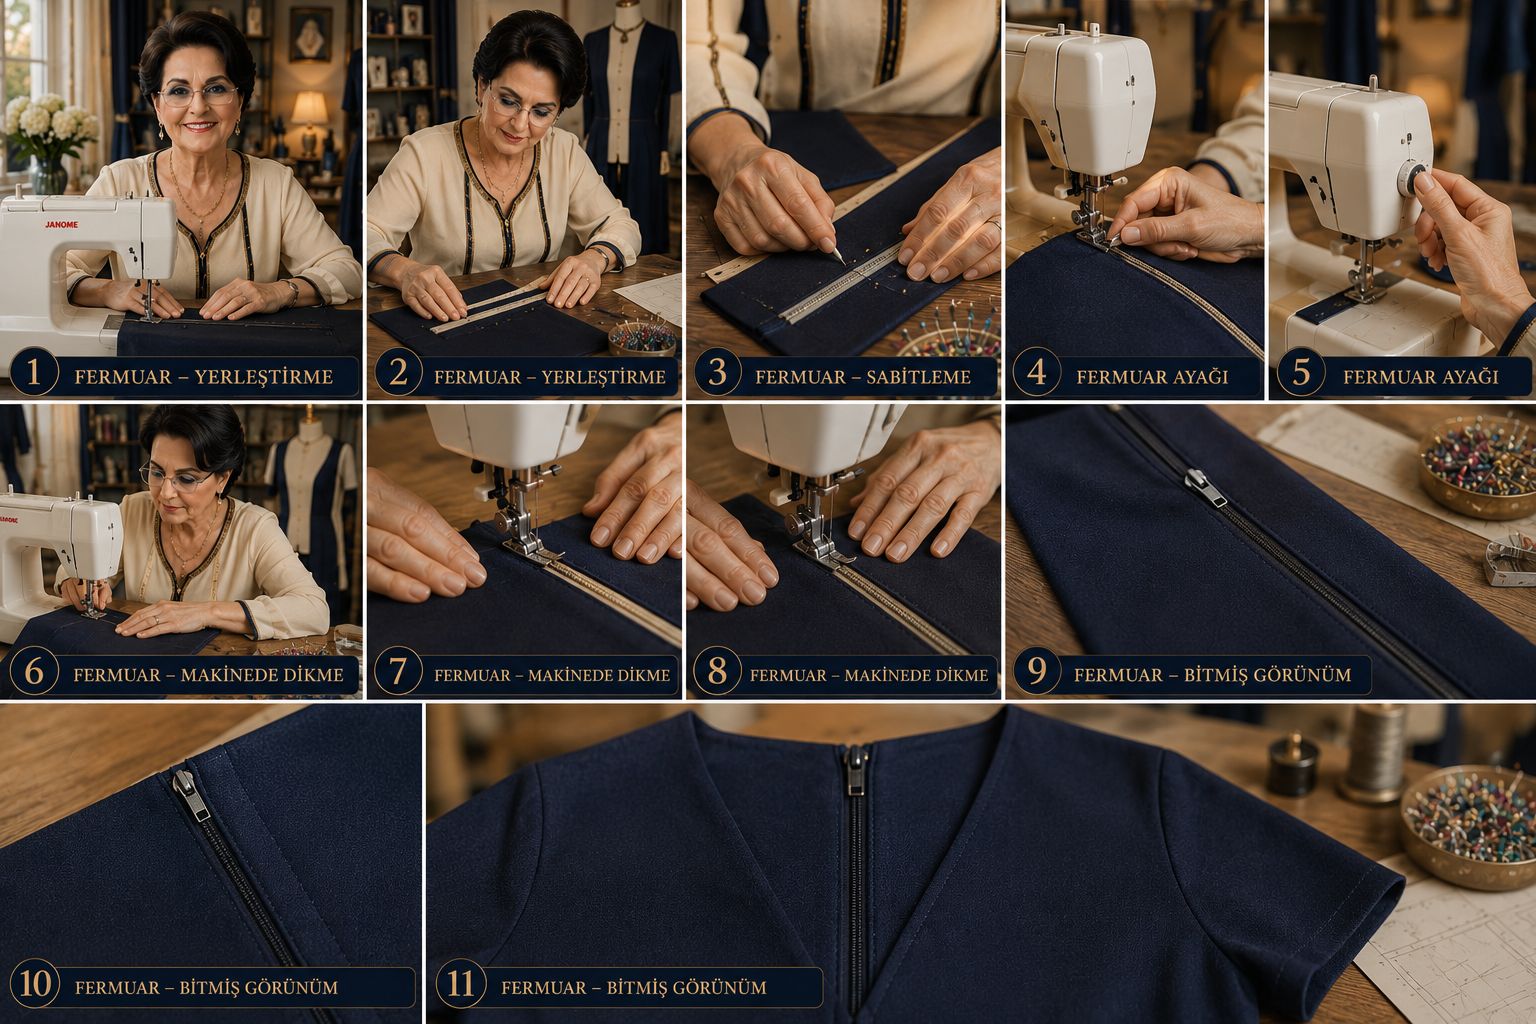
From the atelier — the real process: zip insertion, from placement to finished look.
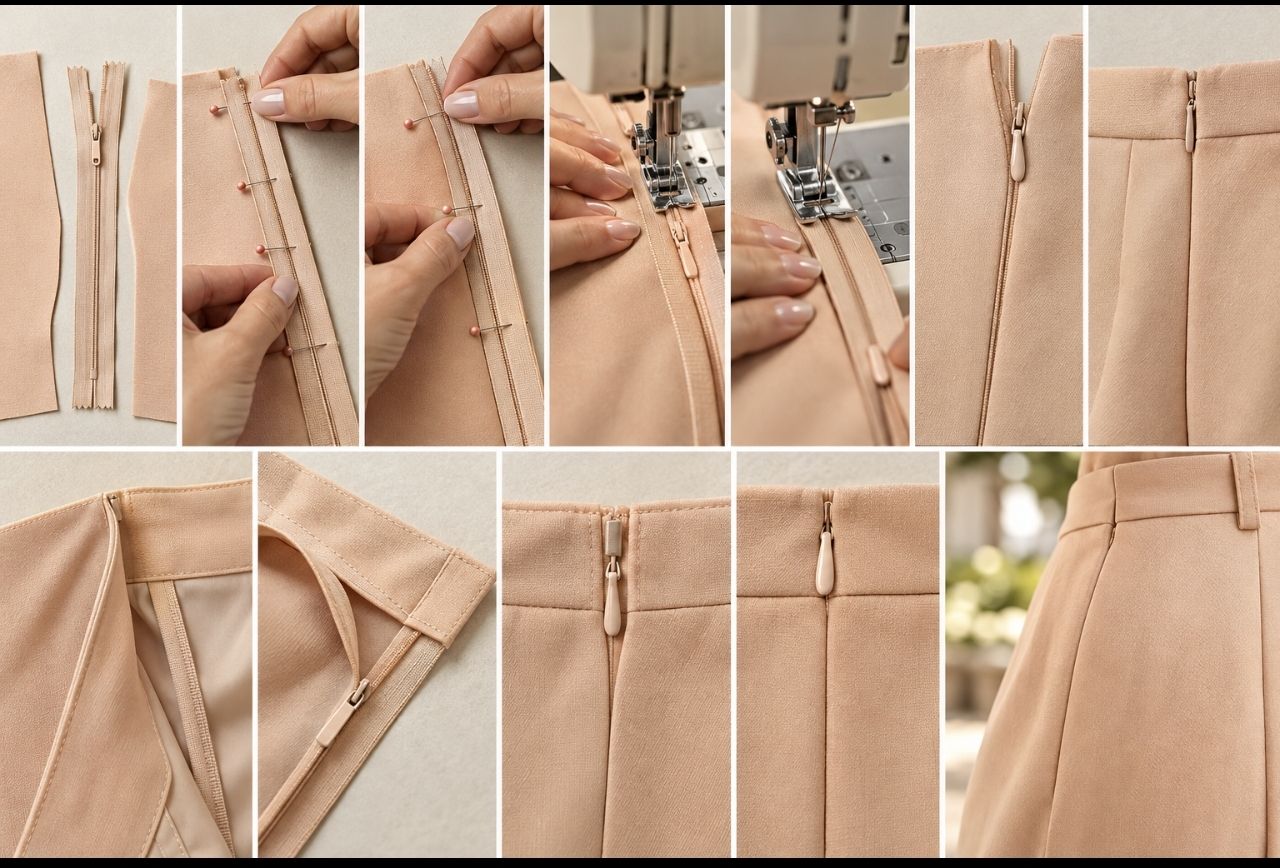
Zip insertion — from placement to finished look, step by step.
A Note from Zarif Atölye: The secret to a beautiful zip is not speed, but preparation. The few minutes you set aside for placement and pinning can transform the look of the finished garment.
A Complementary Technique: Clean Hem Finishing
Measuring → Marking → Folding → Pressing → Stitching → Final Check
The hem is one of the very last parts of a garment to be finished; yet it has a far greater effect on the overall look than we tend to think.
Even a hem that drifts by a few millimetres can be visible to the eye, especially on wide trousers and fluid fabrics.
This is why a clean hem doesn't begin at the machine — it begins while measuring.
1. Measuring — If possible, try the garment on with the shoes it will be worn with. Determine the desired finished length and mark that point. Rather than taking the measurement from a single spot, check it from several points around the hem.
2. Marking — Transfer the measurement you've determined onto the fabric using tailor's chalk or a suitable marking pen that can be removed from the fabric. Mark several points along the hem and make sure they line up evenly.
3. Folding — Fold the fabric inward along the line you've marked. Depending on the type of fabric and the chosen finish, either a single or a double fold can be used. Check that the fold runs at the same width all the way around the hem.
4. Pressing — Setting the fold with an iron before stitching sets a memory into the fabric, sharpens the hemline, and allows for more controlled progress at the machine. The shape of a good hem is often formed on the ironing board before it ever reaches the sewing machine.
5. Machine Stitching — Choose a needle and thread suited to the fabric. Keeping an even distance from the edge of the fold, stitch at a steady, controlled pace. Pay particular attention to making the start and end points of the hem meet cleanly.
6. Final Check — Once the stitching is complete, lay the garment on a flat surface, or try it on again if possible. Is the width of the fold even all the way around the hem? Are both legs the same length? After this final check, a light press at the appropriate heat gives the hem its final form.
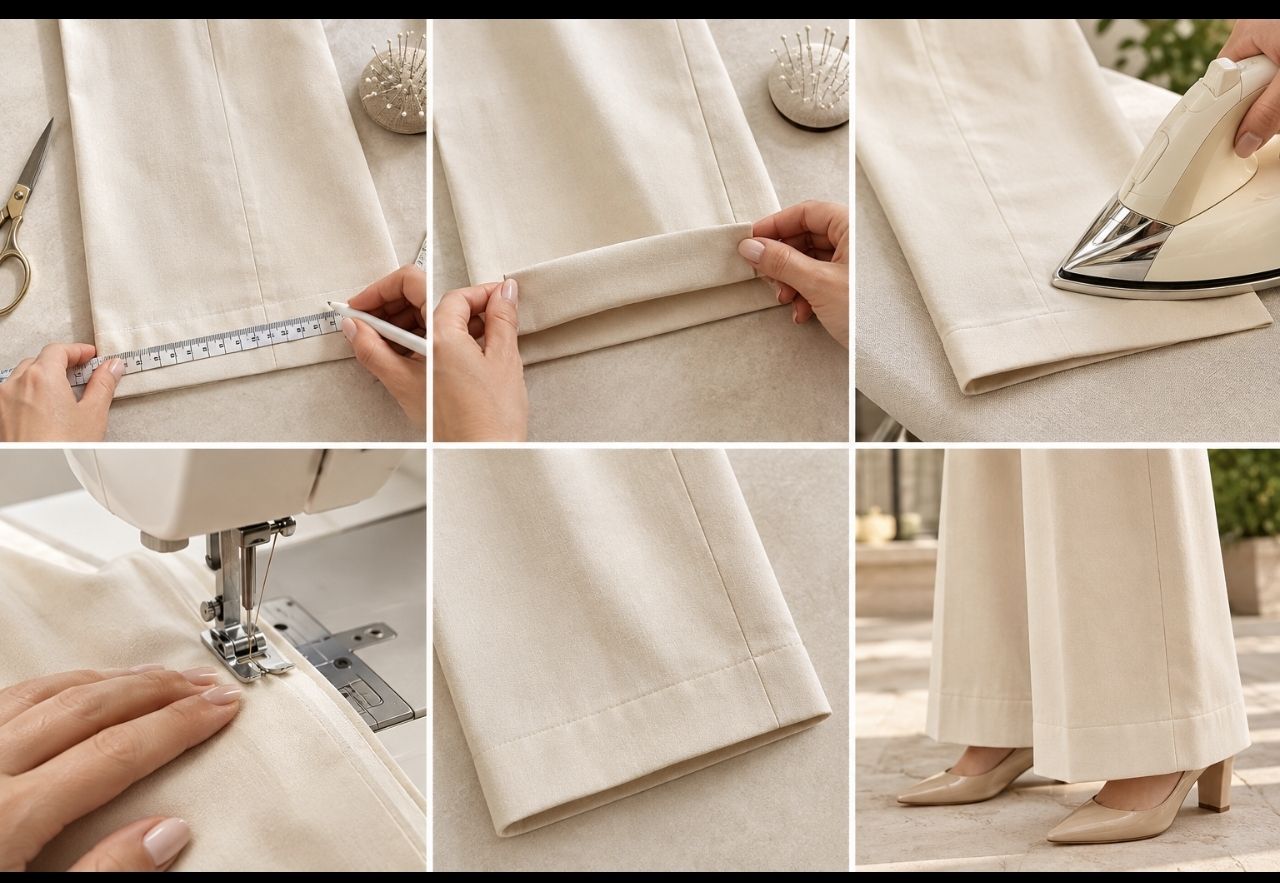
Clean hem finishing — from measuring to finished hem, step by step.
Leaving the Atelier
Mastery in sewing does not always mean knowing the most complex techniques.
Sometimes what makes the difference is doing the most basic steps without rushing, and in the right order.
Looking before cutting. Pinning before stitching. Pressing before stitching. And checking again once the work is done.
Pattern matching, the zip and the hem are three beautiful examples of exactly this.
In the finished garment, perhaps no one will notice each of these small steps individually. But when all of them are done right, the difference will certainly be felt.
Because good sewing doesn't announce itself loudly — it shows itself in the details.
Peach & Champagne
From Summer to Autumn, Four Patterns, One Story
PATTERNED MODELS · SEPTEMBER 2026 — ISSUE 02
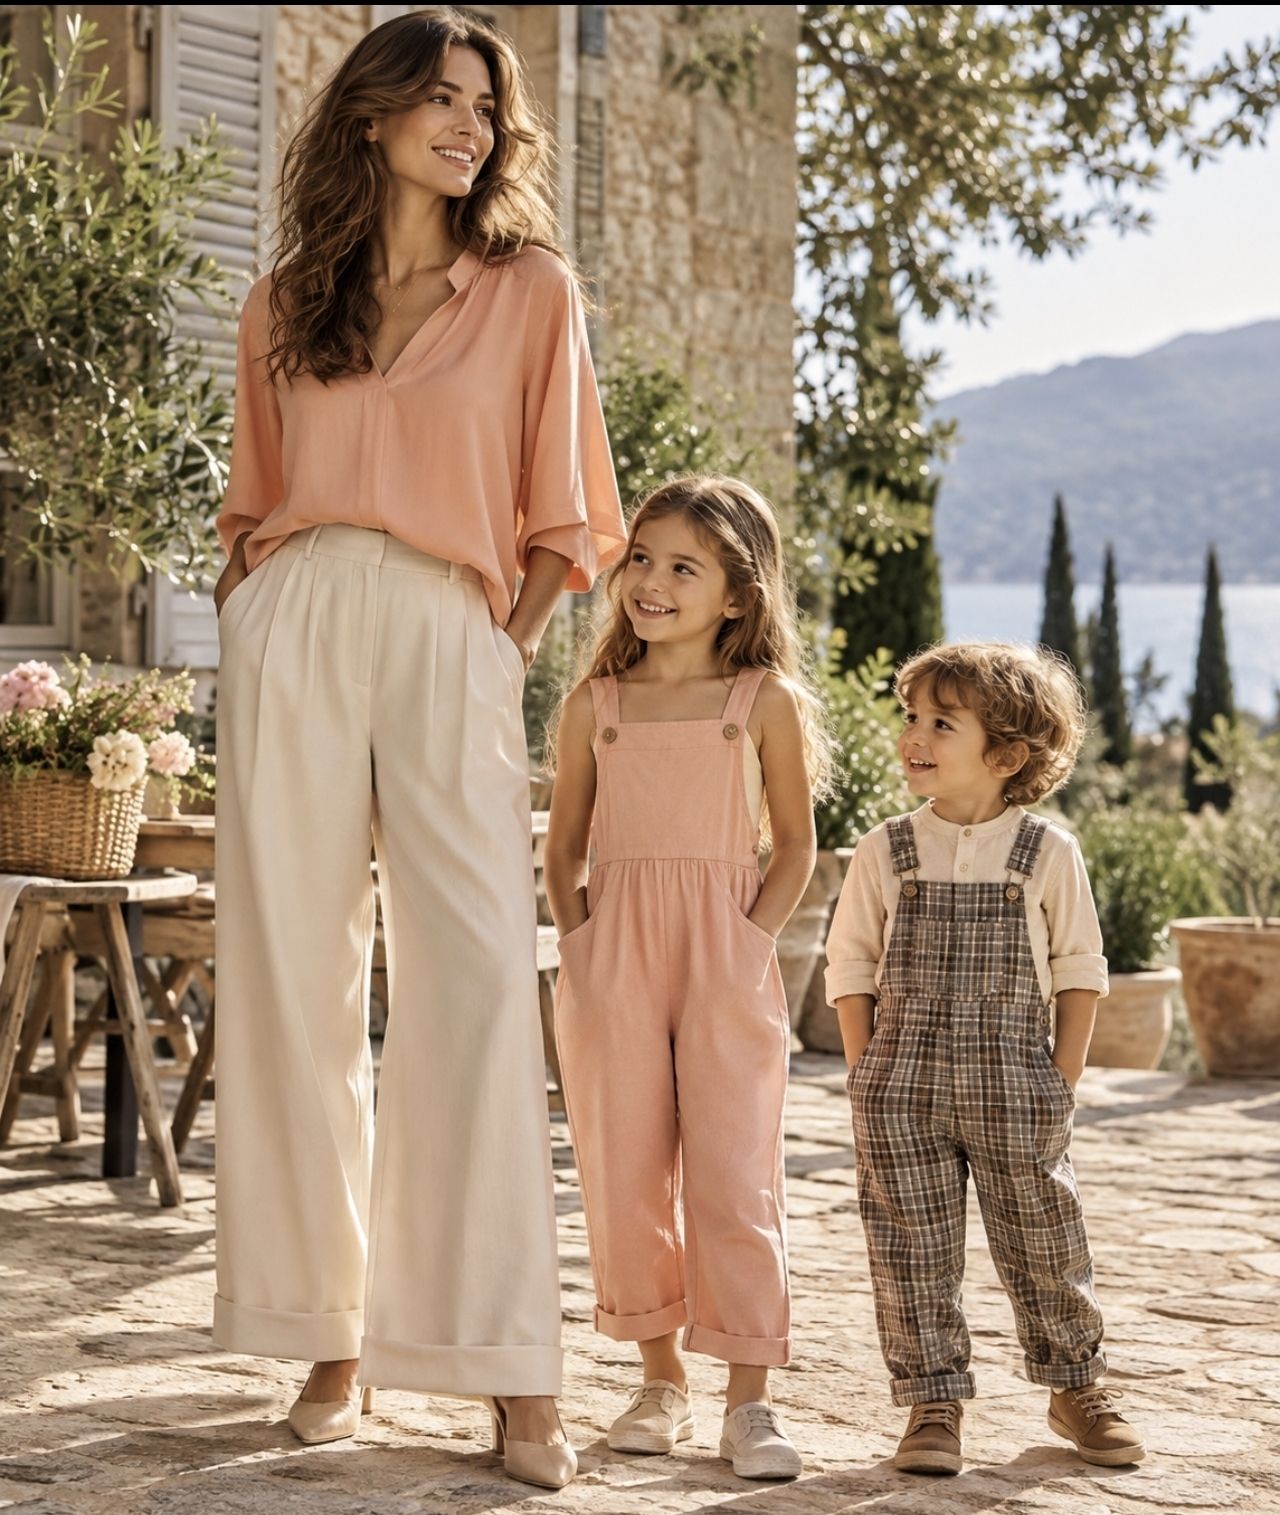
Opening — four pieces of the same colour story: a peach shirt, champagne trousers, a peach romper, and a plaid romper.
As a season changes, a wardrobe doesn't change all at once. While the lightness of summer stays with us a little longer, autumn begins to show itself in colours, in fabrics, and in small details.
Zarif Atölye's September patterns are born exactly from this moment of transition.
This month, our atelier features four separate pieces, all designed within the same world of colour and fabric: an elegant women's shirt in a peach tone, wide-leg women's trousers in champagne, a peach romper for a girl, and a plaid romper for a boy.
Each piece can be worn entirely on its own. Brought together, they become a small September collection belonging to the same family.
Peach carries the warmth left over from summer; champagne carries the soft transition between seasons; and the plaid carries the very first sign of the approaching autumn.
This time, we're not just showing the finished models. We're also examining the pattern structure of each piece. Front, back and side views; the basic pattern pieces that make up the cut, and the size chart, sit alongside the design so that you can read, visually, how the garment is actually constructed.
MODEL 02A — Peach Shirt
For the top of the September set, we took the classic shirt silhouette and reworked it with a softer, more feminine interpretation.
The peach-toned shirt has a relaxed silhouette that falls naturally over the body rather than clinging to it. The shirt collar looks elegant whether worn open or buttoned up, giving the model a timeless look.
The sleeves end just below the elbow. Gently gathered into a cuff, the sleeve shape adds a small amount of volume to the shirt's otherwise simple body. The back yoke and centre pleat are not merely a design detail — they're also part of the ease of movement.
Thanks to its rounded hem, the shirt can be fully tucked into the trousers, tucked in at the front only, or worn loose.
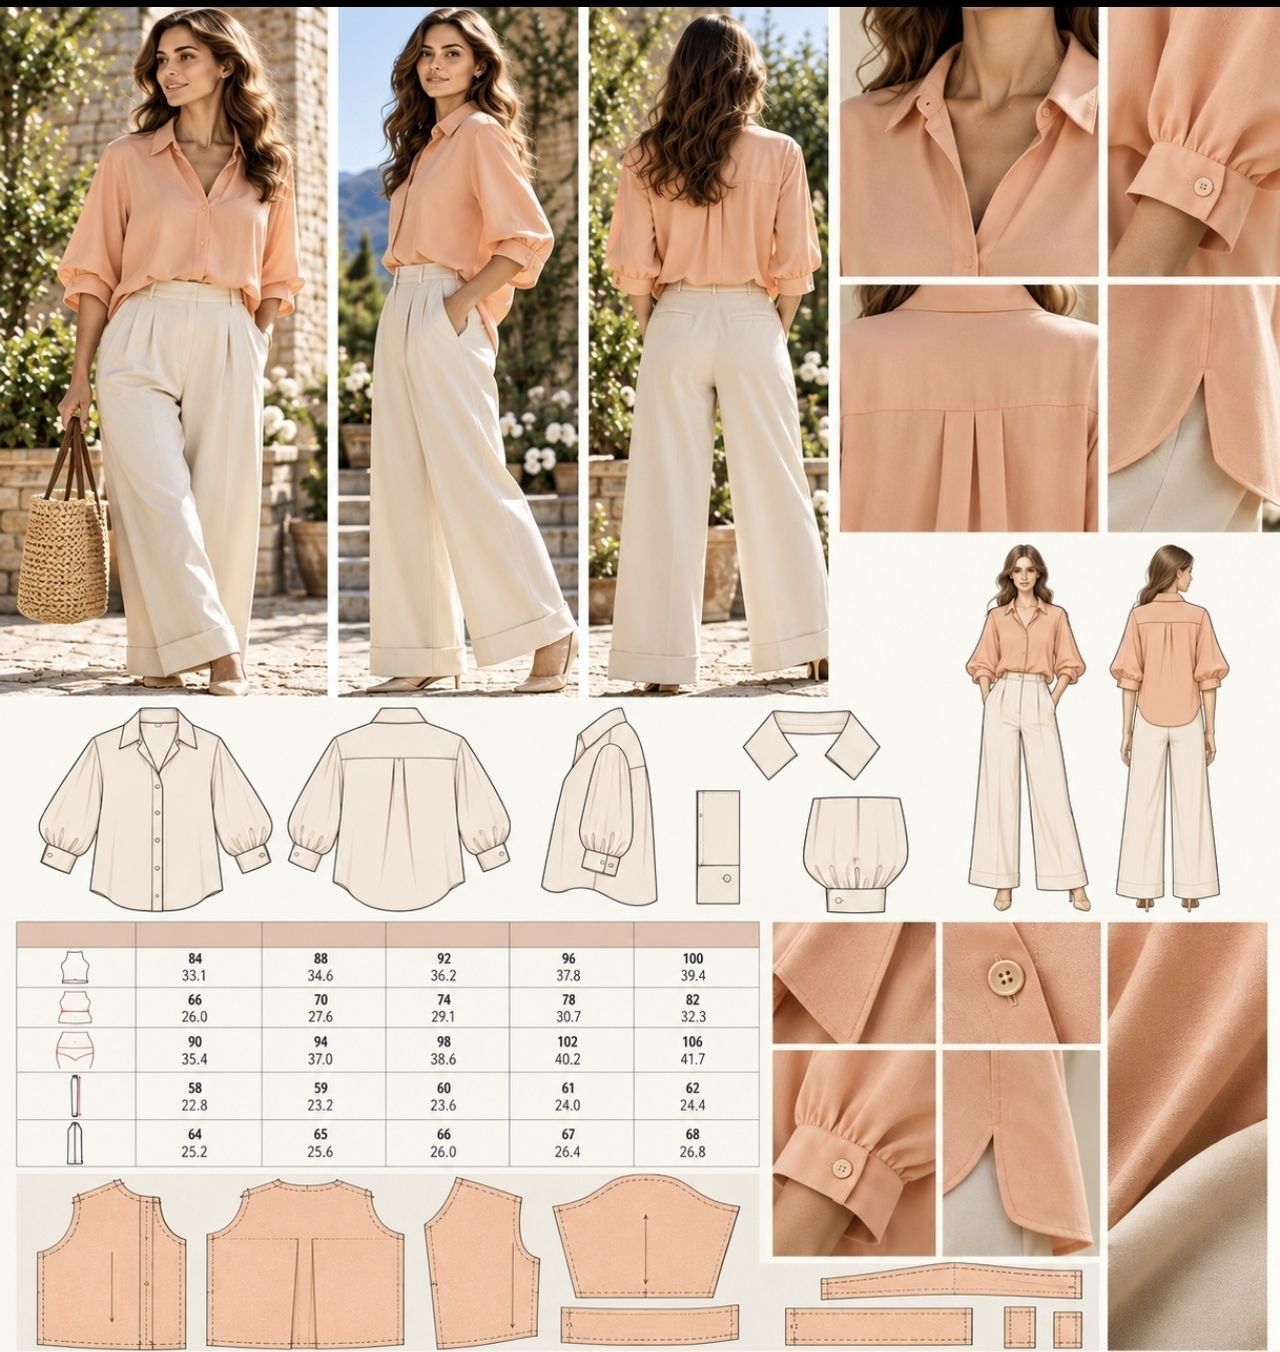
Peach Shirt — front, side and back views; collar, cuff and yoke details; pattern pieces and size chart.
In the pattern work, the front bodice, back bodice, yoke, sleeve, cuff, collar and front placket pieces are all shown separately.
Size range: 36–44. To adapt the pattern across different sizes, sleeve and body length are taken into account alongside bust, waist and hip measurements.
The aim here is not just to show the shape of a shirt, but to make visible which pieces come together, starting from flat fabric, to form a finished garment.
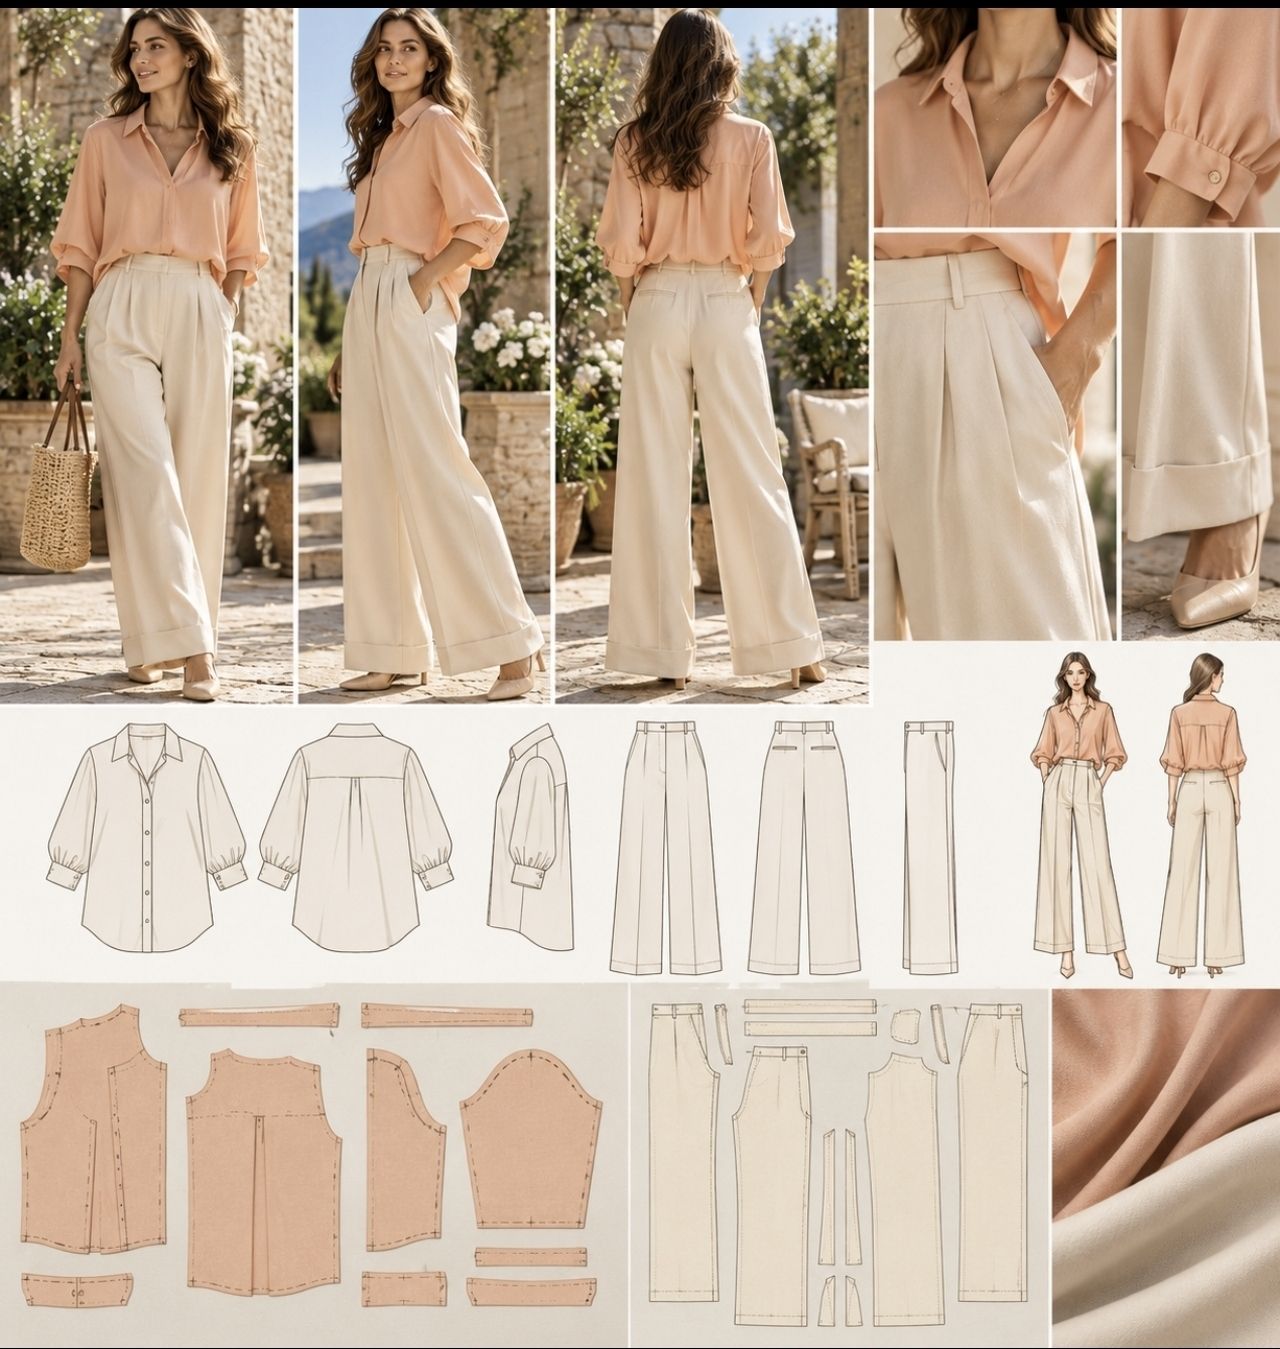
Peach Shirt & Champagne Trousers — worn together; front, side and back views, and the pattern layout for both pieces.
MODEL 02B — Champagne Trousers
The second piece in the set is a pair of high-waisted, wide-leg trousers in a champagne tone.
Keeping the waistline clean and well-defined balances out the volume of the wide leg. Controlled pleats at the front give the trousers room to move while preventing the silhouette from becoming unnecessarily voluminous.
Side pockets make everyday wear easier, while the simple pocket details at the back preserve the trousers' classic tailoring character.
The wide hem finish gives the model a small but distinctive signature.
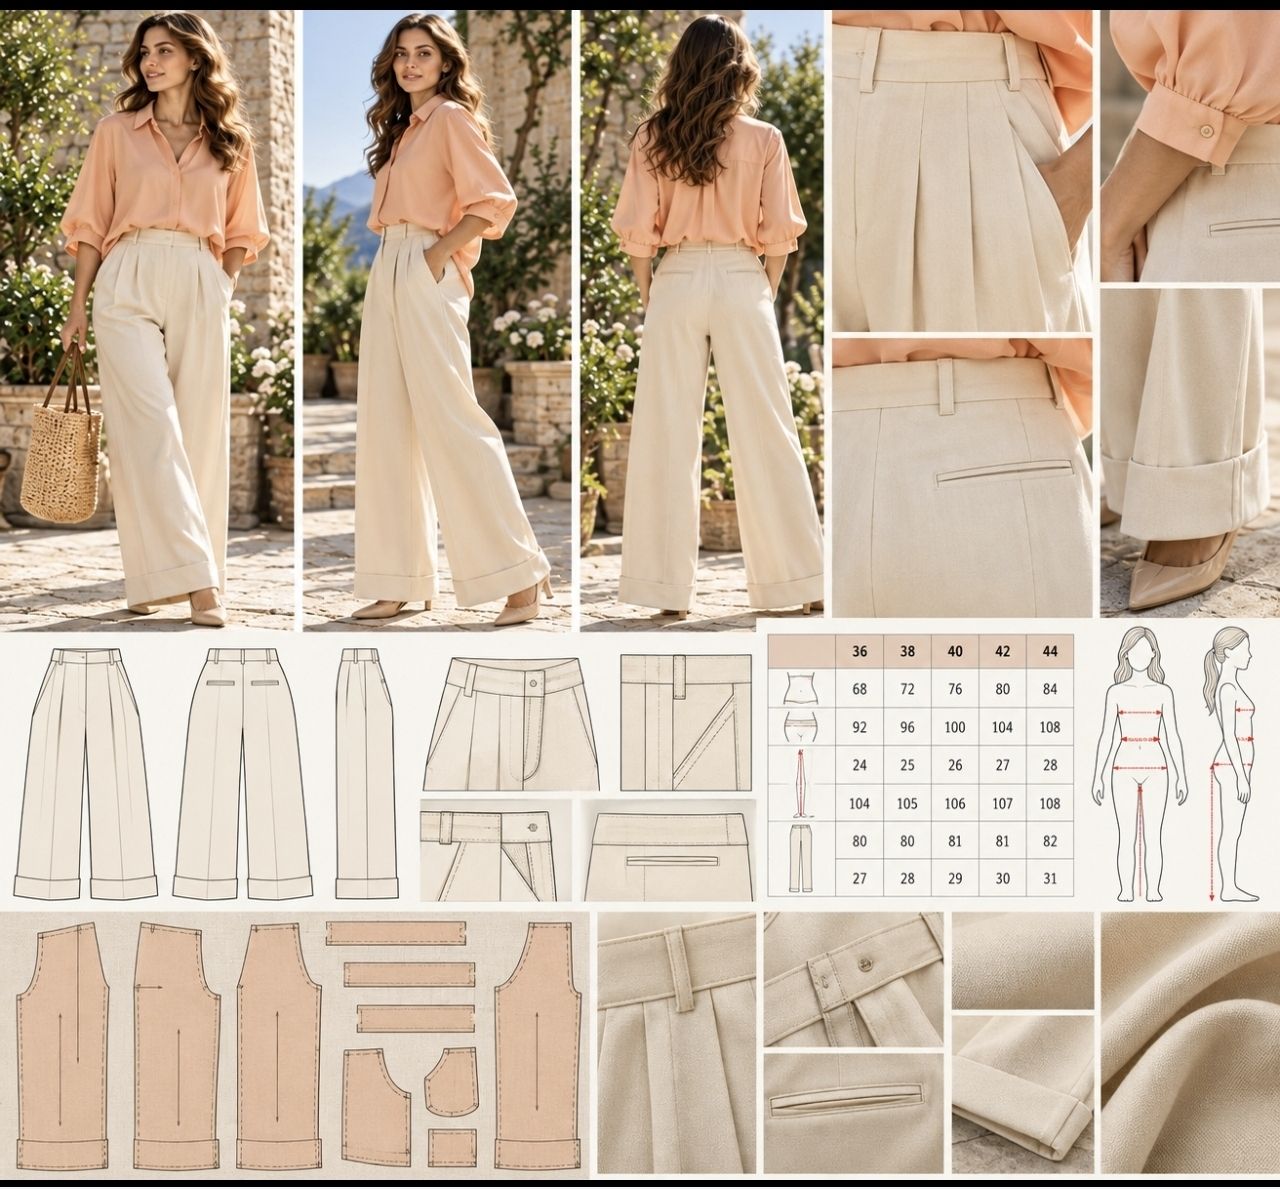
Champagne Trousers — front, side and back views; waistband, pocket and hem details; pattern pieces and size chart.
Worn together with the peach shirt, the colours don't blend into one another — instead, a calm contrast forms between the warm peach and the light champagne.
In the trouser pattern, the front and back leg pieces are handled separately, along with the waistband, pockets and fly.
Size range: 36–44. While waist and hip measurement form the basis for choosing the pattern, inseam and total trouser length allow the garment to be adjusted to the individual.
Because in a good pair of trousers, it isn't only the size number that matters — proportion matters too.
MODEL 03 — Peach Romper for a Girl
The peach tone from the women's set transforms into a freer, more playful shape in the children's wardrobe.
The girl's romper uses a generously cut silhouette that allows easy movement, a front bib panel, and adjustable shoulder straps. Straps that cross at the back give the model both a functional and a distinctive look.
The gentle gathering around the waist allows the romper to sit comfortably on a child's body, while the wide legs preserve freedom of movement.
The pockets aren't purely decorative, either — they're a natural part of how a child's garment relates to daily life.
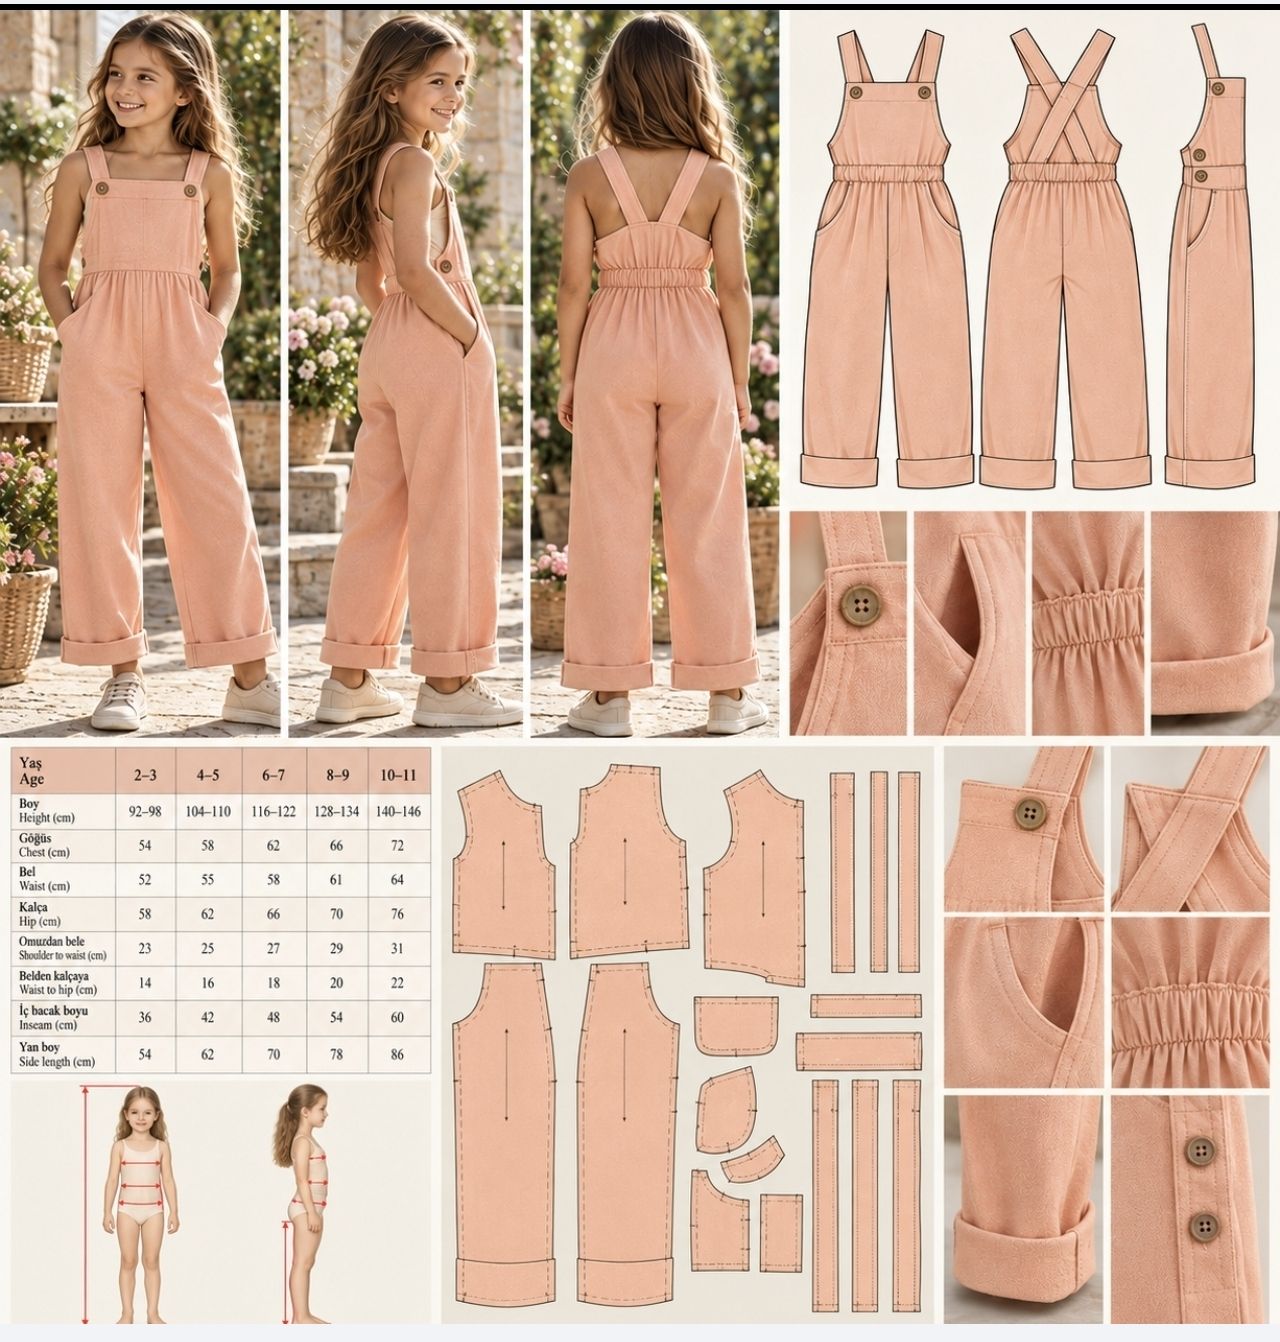
Peach Romper for a Girl — front, side and back views; strap, pocket and waist details; pattern pieces and size chart.
Although it belongs to the same peach family as the women's shirt, this model is not a scaled-down copy of the adult garment. It's the same colour story, redesigned for a child.
Because age alone is not a sufficient measure in children's patterns, pattern selection also takes height, chest, waist, hip and inseam length into account together. This way, the pattern can be chosen according to the child's actual body proportions, not just an age label.
MODEL 04 — Plaid Romper for a Boy
In the final piece of the collection, autumn becomes a little more visible.
Against the solid-colour world of peach and champagne, a plaid in warm beige and earth tones steps forward.
The boy's romper has a relaxed, timeless cut that preserves freedom of movement. A front bib panel, adjustable straps, pockets and straight-leg hems make up its classic romper character.
But in this model, the pattern layout demands a little more attention than the others.
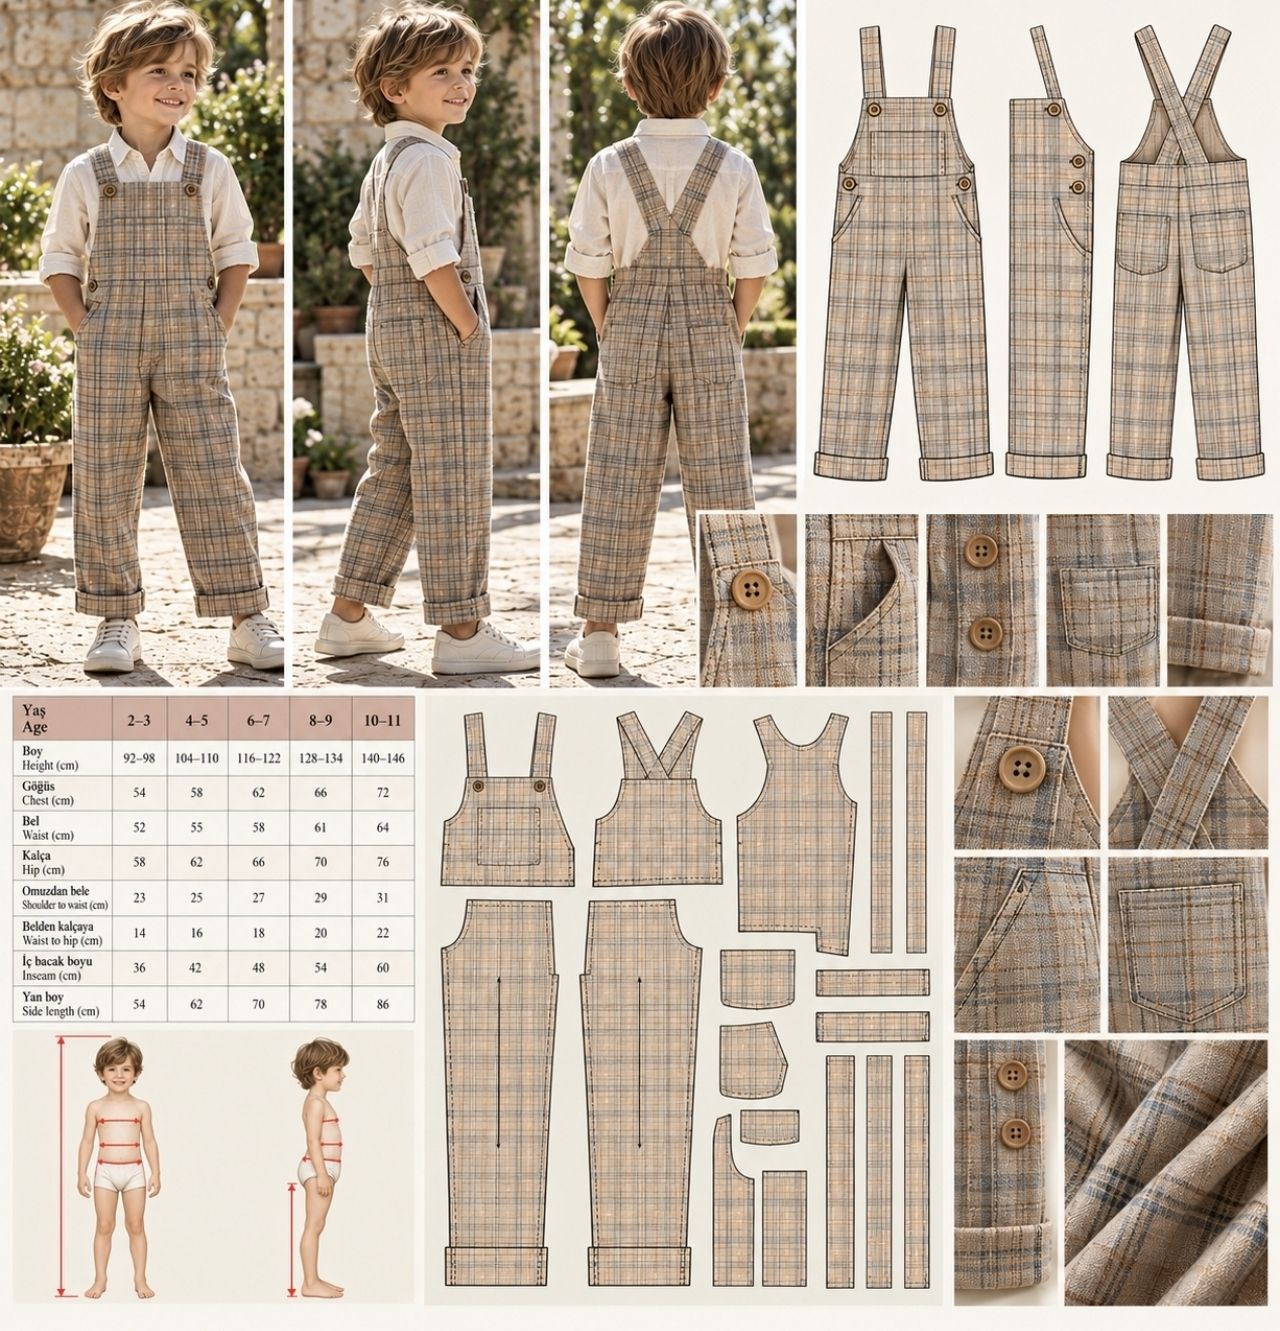
Plaid Romper for a Boy — front, side and back views; button, pocket and strap details; pattern pieces and size chart.
Because on a plaid fabric, the lines should never run randomly across the garment.
When cutting the front and back pieces, the plaid's horizontal and vertical lines need to follow one another at every possible meeting point. Even small pieces like the pockets are placed with the main fabric's pattern in mind.
This way, the pattern is designed not only around the body, but around the pattern of the fabric as well.
In choosing a child's size, height, chest, waist, hip and inseam measurements are again taken as the basis, alongside age.
Reading the Pattern
At first glance, a pattern may look like nothing more than a set of shapes to be placed on fabric.
Yet every line has a purpose.
The front and back bodices establish the garment's main form. The sleeve, collar, cuff, strap, pocket and waistband pieces are added onto this form. The straight grain line shows how a piece should be placed on the fabric; the notches show where the different pieces should meet.
This is also why the size chart is never just a list of numbers.
A 36, 38, 40, 42 or 44 on its own may not be enough. Two people wearing the same size can have very different bust, waist, hip, or height proportions.
In children, this difference is even more pronounced. Two children of the same age don't necessarily share the same height or body proportions.
This is why the first step in every Zarif Atölye pattern is always the same:
Measurements first, pattern second.
Leaving the Atelier
September's patterns show us how the same colour story can become four different garments.
A peach shirt and champagne trousers form a calm September set for an adult wardrobe, while the same world of colour takes on a more playful mood in the girl's romper. The plaid boy's romper, meanwhile, adds the first texture of autumn to the small collection.
Four different patterns, four different garments…
But behind all of them lies the same idea:
Good design tells us not only how something looks, but how a garment is made.