SEWING
The Elegance of Handwork
6 min read + practice
In this issue's workshop we learn two fundamental yet timeless techniques, step by step: the overcast (whip) stitch that finishes a fabric's raw edge, and buttonhole-making — the smallest detail that completes a garment. We've made this guide clear enough that you won't need a video.
THE ZARİF ATELIER
Overcast Stitch
The Quiet Detail That Extends a Fabric's Life · 🕒 6 Min Read
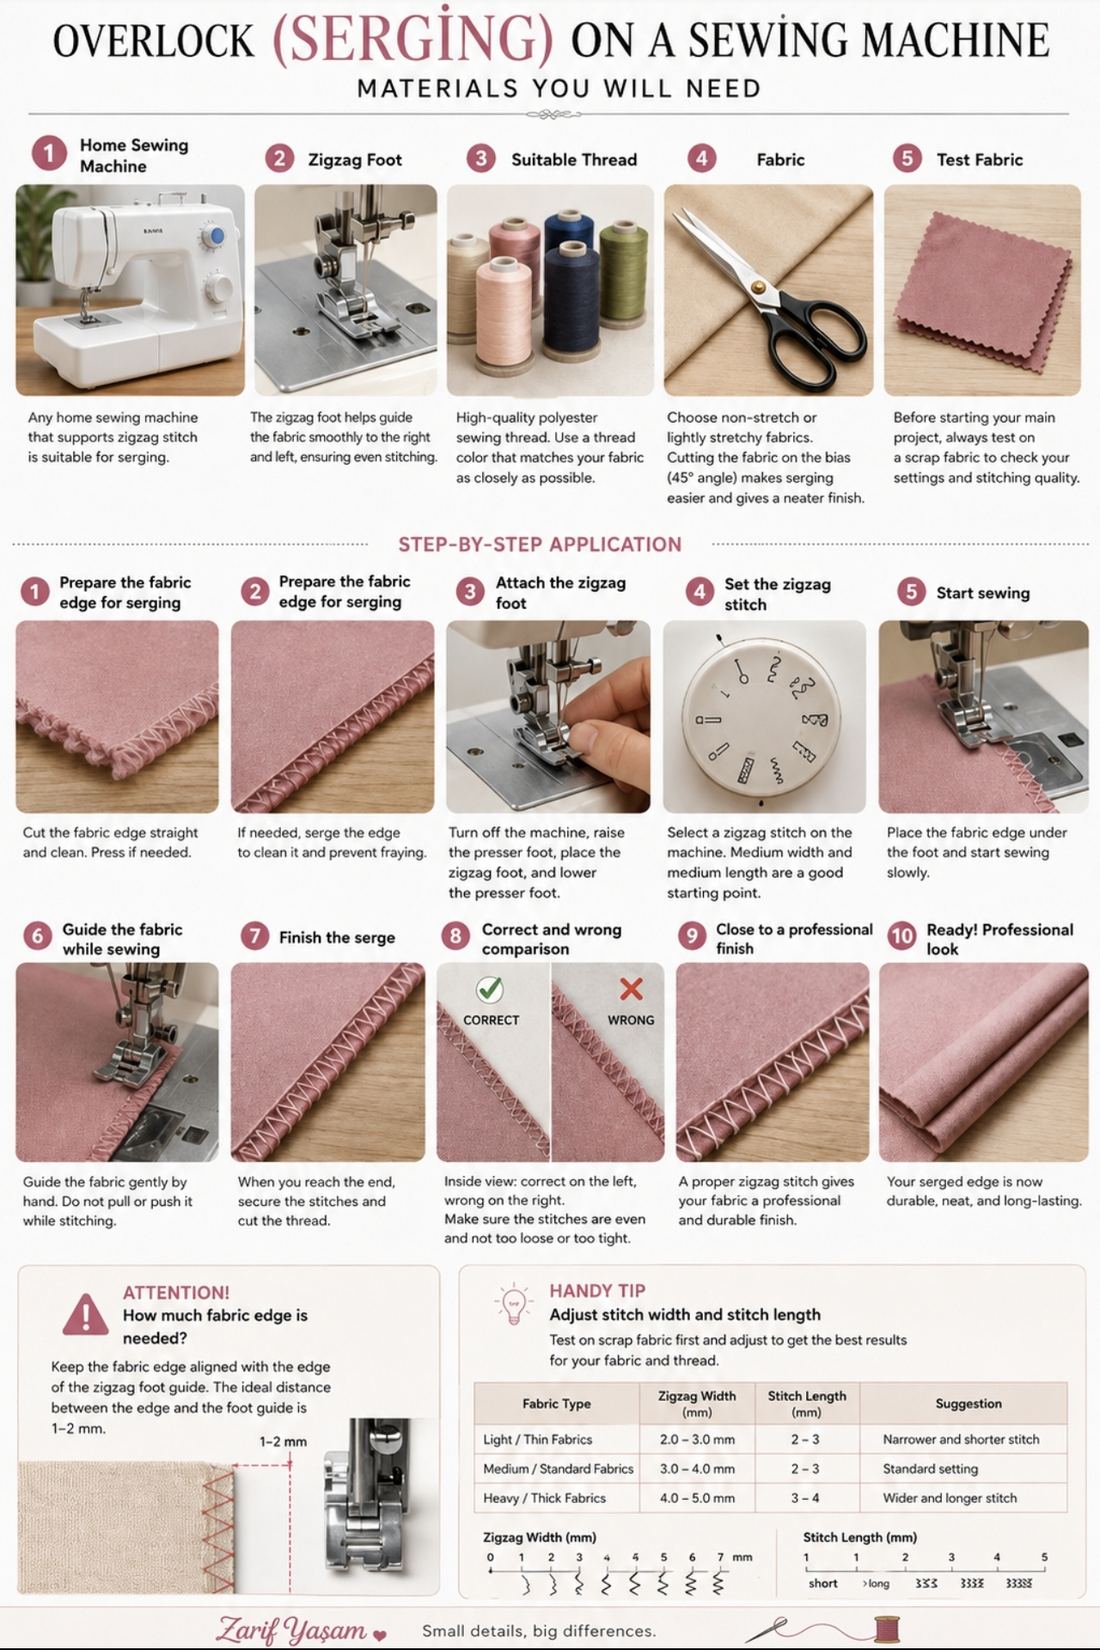 Every garment has a face you can see. And then there are the details only the person who sewed it truly knows — the ones you never see. The overcast stitch is one of the finest examples of this invisible care.
Even though it goes unnoticed from the outside, a clean overcast finish keeps a fabric from fraying over time, strengthens the durability of the seams, and helps a garment hold its shape for years. This is why, in professional tailoring, the overcast stitch is regarded not merely as a technical step, but as the quiet signature of quality craftsmanship.
In this piece, we'll look together at what the overcast stitch is, why it matters, which fabrics it's used on, and the essential steps to get a clean result with a home sewing machine.
Because true mastery is found not only in visible beauty, but in the care given to what no one sees.
What Is an Overcast Stitch?
An overcast stitch is a protective sewing technique used to keep a fabric's cut edges from fraying. It stops the fabric from unravelling, strengthens the seam allowance, and helps a garment last longer. It also gives the inside of a garment a neat, well-finished look.
Most home sewers create an overcast finish using the zigzag stitch built into their home sewing machine. With the right settings, this method gives an extremely sturdy and clean result for everyday use.
In this piece, we'll walk through every step using a home sewing machine.
Every garment has a face you can see. And then there are the details only the person who sewed it truly knows — the ones you never see. The overcast stitch is one of the finest examples of this invisible care.
Even though it goes unnoticed from the outside, a clean overcast finish keeps a fabric from fraying over time, strengthens the durability of the seams, and helps a garment hold its shape for years. This is why, in professional tailoring, the overcast stitch is regarded not merely as a technical step, but as the quiet signature of quality craftsmanship.
In this piece, we'll look together at what the overcast stitch is, why it matters, which fabrics it's used on, and the essential steps to get a clean result with a home sewing machine.
Because true mastery is found not only in visible beauty, but in the care given to what no one sees.
What Is an Overcast Stitch?
An overcast stitch is a protective sewing technique used to keep a fabric's cut edges from fraying. It stops the fabric from unravelling, strengthens the seam allowance, and helps a garment last longer. It also gives the inside of a garment a neat, well-finished look.
Most home sewers create an overcast finish using the zigzag stitch built into their home sewing machine. With the right settings, this method gives an extremely sturdy and clean result for everyday use.
In this piece, we'll walk through every step using a home sewing machine.
A NOTE FROM ZARİF YAŞAM
A good seam is told not only by the front of a garment, but by the care shown on its inside. A clean overcast finish is the quiet but powerful signature of handmade work.
What You'll Need for Overcasting on a Home Sewing Machine
A good seam is told not only by the front of a garment, but by the care shown on its inside. A clean overcast finish is the quiet but powerful signature of handmade work.
1A Home Sewing Machine
Almost any home sewing machine that can do a zigzag stitch is suitable for overcasting.
2A Zigzag Foot
A zigzag foot lets the needle move smoothly left and right, helping the overcast stitch form evenly.
3The Right Sewing Thread
A quality polyester sewing thread is both durable and gives a cleaner finish along the fabric edge.
4Fabric Scissors
A sharp pair of fabric scissors is the first requirement for clean edges — a crooked or worn cut will make the overcast stitch look uneven too.
5A Test Fabric Scrap
Doing a test stitch on a small scrap of the same fabric before starting your actual project lets you get the settings right.
Making a Buttonhole
The First Step to a Flawless Button · 🕒 7 Min Read
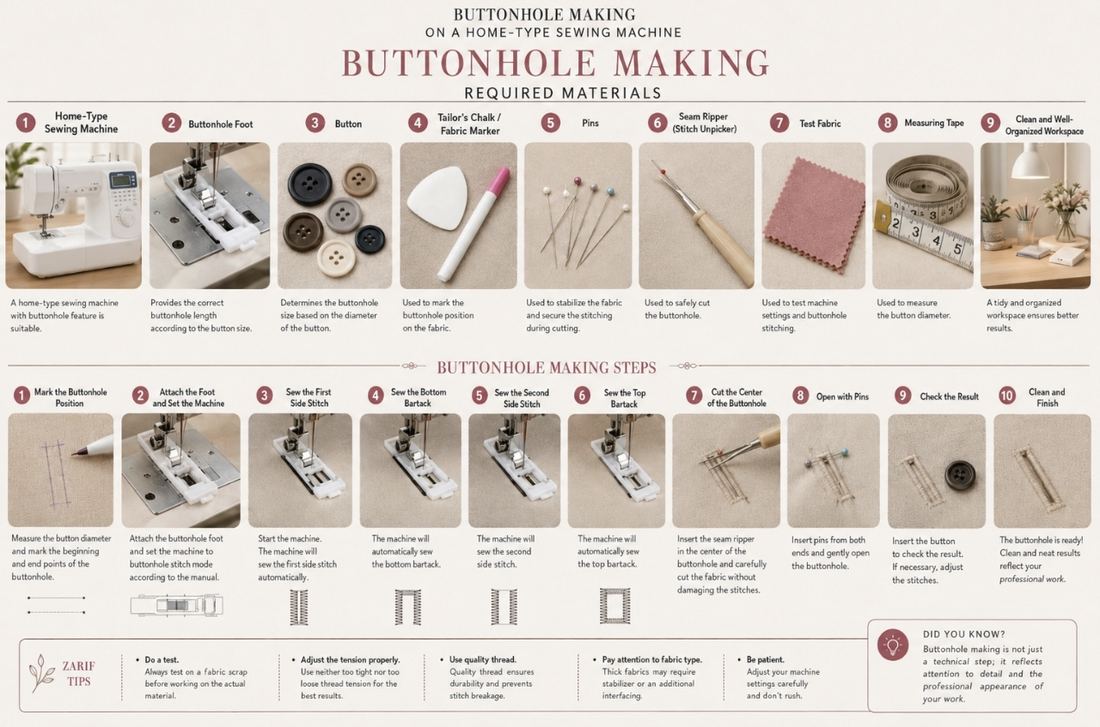 A buttonhole prepared to the right measurement, sewn cleanly and cut with care gives a garment a professional look while letting the button open and close with ease. It may seem like a small detail, but it is one of the clearest markers of quality sewing.
What Is a Buttonhole?
A buttonhole is a stitched opening cut into fabric so a button can be used securely and comfortably on a garment.
The buttonhole's border is first reinforced on the machine with a special buttonhole stitch, then the centre is carefully cut open to create the opening the button will pass through.
With the right measurement, the right marking and the right machine settings, you can create clean, durable buttonholes at home too.
A buttonhole prepared to the right measurement, sewn cleanly and cut with care gives a garment a professional look while letting the button open and close with ease. It may seem like a small detail, but it is one of the clearest markers of quality sewing.
What Is a Buttonhole?
A buttonhole is a stitched opening cut into fabric so a button can be used securely and comfortably on a garment.
The buttonhole's border is first reinforced on the machine with a special buttonhole stitch, then the centre is carefully cut open to create the opening the button will pass through.
With the right measurement, the right marking and the right machine settings, you can create clean, durable buttonholes at home too.
A NOTE FROM ZARİF YAŞAM
On a quality garment, it's the button that catches the eye at first glance — but it's the carefully made buttonhole that lets that button sit flawlessly.
What You'll Need to Make a Buttonhole on a Home Sewing Machine
On a quality garment, it's the button that catches the eye at first glance — but it's the carefully made buttonhole that lets that button sit flawlessly.
1A Home Sewing Machine
Almost any home sewing machine with a buttonhole function will work.
2A Buttonhole Foot
Lets you sew a buttonhole at the length that matches your button.
3A Button
The buttonhole's size is determined by the diameter of the button you're using.
4Tailor's Chalk / an Erasable Marking Pen
Used to mark the buttonhole's position on the fabric.
5Pins
Help hold the fabric in place and protect the stitching during the final cut.
6A Seam Ripper
Used to cut the buttonhole open safely.
7A Test Fabric Scrap
Used to check your machine settings before working on the real fabric.
8A Tape Measure
Used to measure the diameter of the button.
9A Tidy Work Area
A calm, organised space helps you get a cleaner result.
1Measure the Button
Measure the button's diameter. The buttonhole's length is set from this measurement — generally, button diameter + 0.5 cm is the ideal length.
2Mark the Buttonhole Position
Mark the buttonhole's position on the fabric with tailor's chalk or a fabric marking pen, leaving the right allowance for the button's thickness.
3Attach the Buttonhole Foot and Set Up
Attach the buttonhole foot to your machine. Set your machine to its four-step (or automatic) buttonhole program. Check the required stitch length and width settings.
4Sew the Buttonhole
Start the machine once the needle reaches the marked starting point. The machine will complete the buttonhole stitch automatically. Don't pull the fabric until the process is finished.
5Cut the Buttonhole Open and Check It
Once the stitching is complete, carefully cut the centre open with a seam ripper. Check the edges of the buttonhole and trim any loose threads.
✗ Incorrect
- Uneven width
- Irregular stitching
- Loose thread ends at the edges
✓ Correct
- Even width
- Consistent stitch density
- Clean, sturdy edges
✗ Incorrect
- Cutting too far at the centre
- Damaging the fabric
- Broken threads
✓ Correct
- Cutting the centre carefully
- Protecting the fabric
- A clean, neat finish
TIP
Rather than rushing the buttonhole stitch, let your machine complete its full program. You'll get a neater, sturdier result.
Rather than rushing the buttonhole stitch, let your machine complete its full program. You'll get a neater, sturdier result.
A TIP FROM ZARİF YAŞAM
Patience and care in every seam add value to the fabric. A well-made buttonhole shows the quality of a garment and helps it keep its shape for years.
Patience and care in every seam add value to the fabric. A well-made buttonhole shows the quality of a garment and helps it keep its shape for years.
A SMALL STEP YOU CAN TAKE TODAY
Make a buttonhole on your test fabric scrap.
Checklist
Make a buttonhole on your test fabric scrap.
- Button measured.
- Position marked.
- Machine settings adjusted.
- Test done.
- Buttonhole sewn and cut.
A FINAL WORD
Every carefully made buttonhole adds value to your work and extends the life of your garment.
THE ZARİF ATELIER — MODEL NO. 001
Every carefully made buttonhole adds value to your work and extends the life of your garment.
Summer Dress
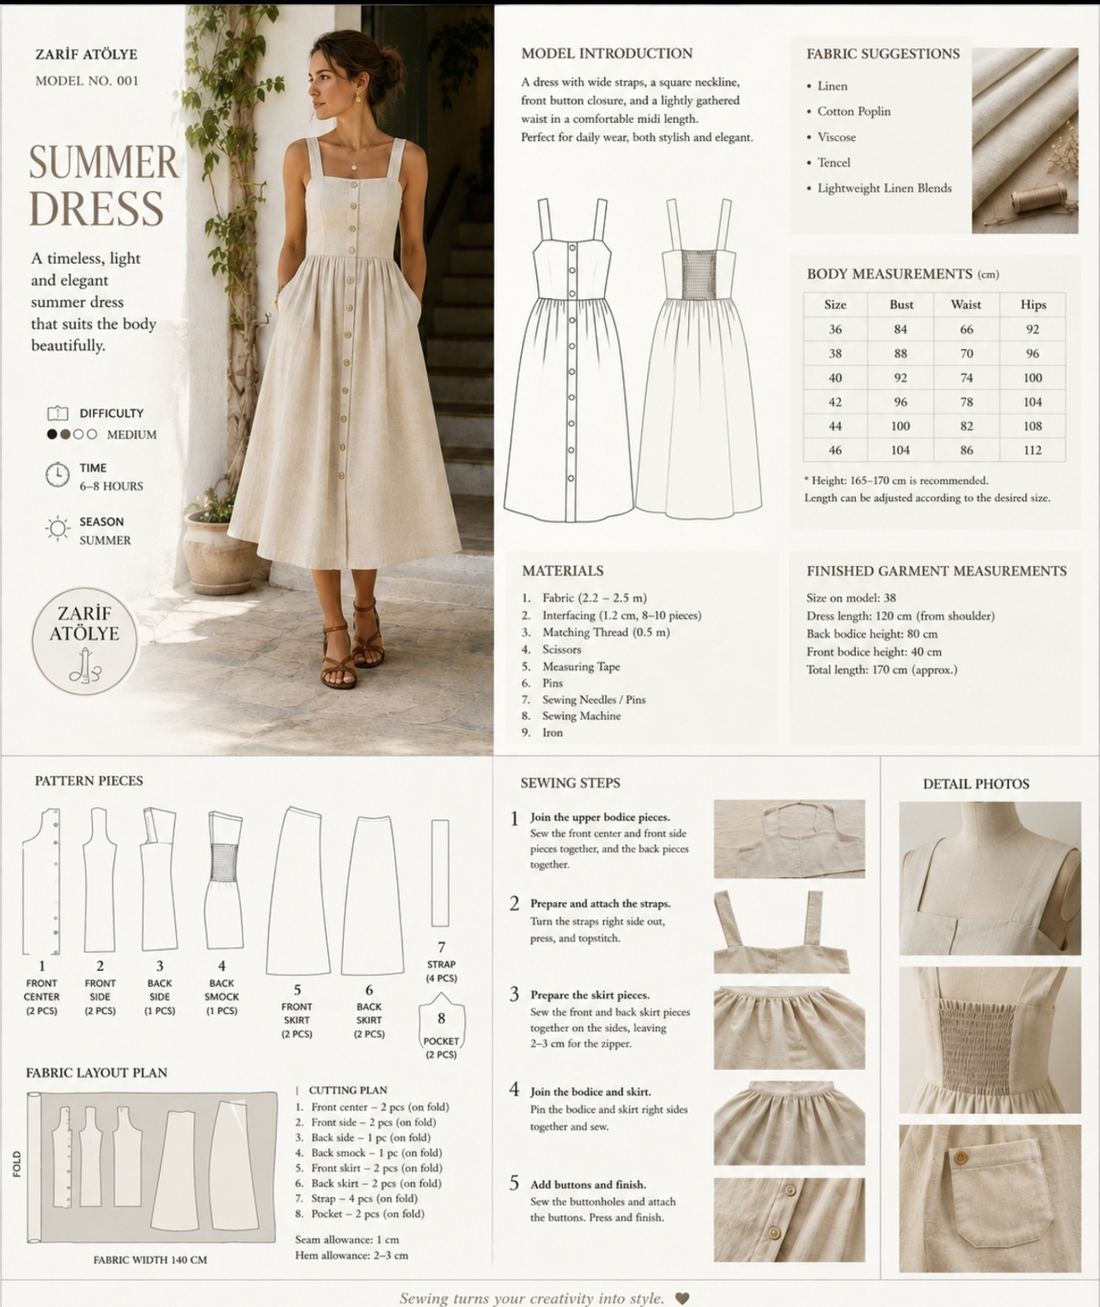
A timeless, lightweight summer dress that flatters every body
LevelIntermediate (2/4)
Time6–8 hours
SeasonSummer
| Size | Bust | Waist | Hip |
|---|---|---|---|
| 36 | 84 | 66 | 92 |
| 38 | 88 | 70 | 96 |
| 40 | 92 | 74 | 100 |
| 42 | 96 | 78 | 104 |
| 44 | 100 | 82 | 108 |
| 46 | 104 | 86 | 112 |
1Assemble the bodice pieces
Sew the front centre, front side and back bodice pieces together at the shoulder and side seams.
2Prepare and attach the straps
Turn the straps right-side out along their seam allowance, press, and secure them to the shoulders.
3Prepare the skirt pieces
Sew the skirt front and back pieces together at the side seams, then fold the hem 2–3 cm and stitch.
4Join the bodice and skirt
Gather the skirt and sew it to the bodice.
5Sew the buttons and buttonholes
Fold the front centre seam allowance inward and press, then make the buttonholes and sew on the buttons.
Sewing is one of the most beautiful ways to turn your creativity into wearable elegance.
THE ZARİF ATELIER — CHILDREN'S COLLECTION — MODEL NO. 001-C
Little Girl's Dress
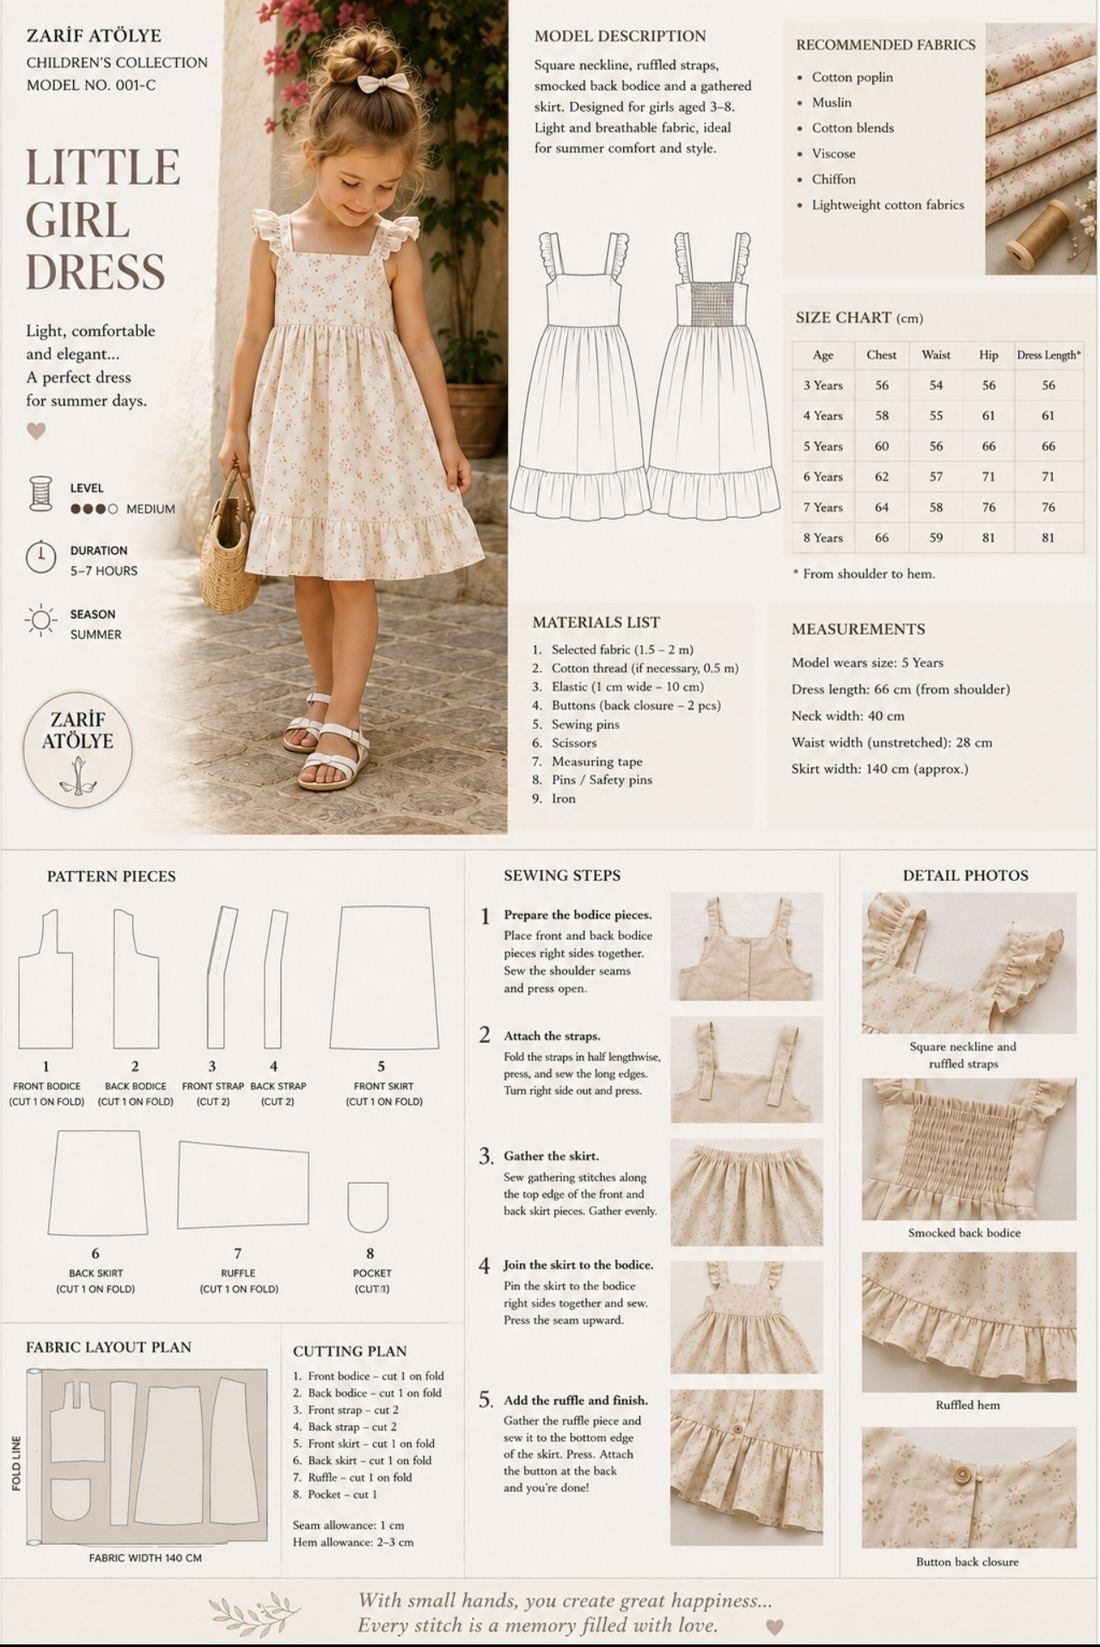
Light, comfortable and elegant... A lovely dress for summer days
LevelIntermediate (2/4)
Time5–7 hours
SeasonSummer
| Age | Bust | Waist | Dress Length* |
|---|---|---|---|
| 3 | 56 | 54 | 56 |
| 4 | 58 | 55 | 61 |
| 5 | 60 | 56 | 66 |
| 6 | 62 | 57 | 71 |
| 7 | 64 | 58 | 76 |
| 8 | 66 | 59 | 81 |
1Prepare the bodice pieces
Pin and sew the front and back bodice pieces together. Press the shoulder seams open.
2Prepare and attach the straps
Fold the straps in half and sew, turn right-side out and press. Pin and sew them to the shoulders.
3Gather the waist
Sew two rows of the longest straight stitch along the top edge of the skirt front and back pieces. Gather.
4Join the skirt to the bodice
Pin the gathered skirt to the bodice and sew. Press the seam allowance upward.
5Add the ruffle and finish
Gather the ruffle piece along its long edge, pin it to the hem and sew. Close the back centre with a button. Finish with a final press.
Stitch big joys with small hands... Every seam is a memory that grows with love.